안녕하세요!ㅎㅎ 저희 팀은 딥러닝 모델을 경량화하여 운전자의 졸음 운전 및 운전 중 부주의를 방지하는 운전자 모니터링 서비스를 개발하고 있는 팀입니다.
오늘은 안드로이드 스튜디오에 구글맵(Google Map)을 추가하는 방법을 알려드리려고 해요.

.
.
.
.
시작해볼까요?
https://developers.google.com/maps/documentation/android-sdk/start?hl=ko
Android용 Maps SDK 빠른 시작 | Google for Developers
지금 바로 Android 앱용 Google 지도 프로젝트를 새로 시작해 보세요. 다음과 같이 SDK 설치부터 앱 빌드 및 실행에 이르기까지 필요한 모든 것을 찾을 수 있습니다.
developers.google.com
다음은 안드로이드 스튜디오에 맵을 추가하기 위한 빌드지침이 포함된 사이트입니다. 사이트에 명시된 것처럼 Kotlin, Java 모두로 구현이 가능한데, 저는 Kotlin으로 구현을 했습니다!
1. API 키 발급받기
우선, 구글맵을 사용하기 전 API 키를 발급받는 과정입니다. 오늘의 절차중에 가장 복잡한 절차일 수 있겠는데요, 그만큼 오늘 작업이 수월하다는 의미이니 자칫 까다롭게 느껴지시더라도 저와 함께 과정을 차근차근 함께해주시면 감사하겠습니다.
https://mapsplatform.google.com/
Google Maps Platform - Location and Mapping Solutions
Create real world and real time experiences for your customers with dynamic maps, routes & places APIs from Google Maps Platform’s location solutions.
mapsplatform.google.com
위 사이트에 접속해서 로그인을 한 후, API 키를 발급받아야 합니다. 처음에 결제창이 떠서 당황하실 수 있습니다. 기존에 결제프로필을 등록하신 분들은 기존 프로필을 선택할 수 있는데, 결제프로필을 등록하지 않은 분들은 결제 프로필을 만들어주세요.

Google Cloud는 $300까지 무료로 지원을 해주고, 이후 유료결제는 사용자에게 고지된 후 허가를 받은 후에 결제되기 때문에 결제정보를 입력했다고해서 자동결제가 될 걱정은 안하셔도 됩니다😆
이제 다음으로
- 무료 평가판 시작하기 버튼을 클릭합니다.
- Google Maps Platform 사용 설정이라는 이름으로 간단한 설문이 표시될 수 있습니다. 설문을 완료하고, 제출 버튼을 클릭합니다.
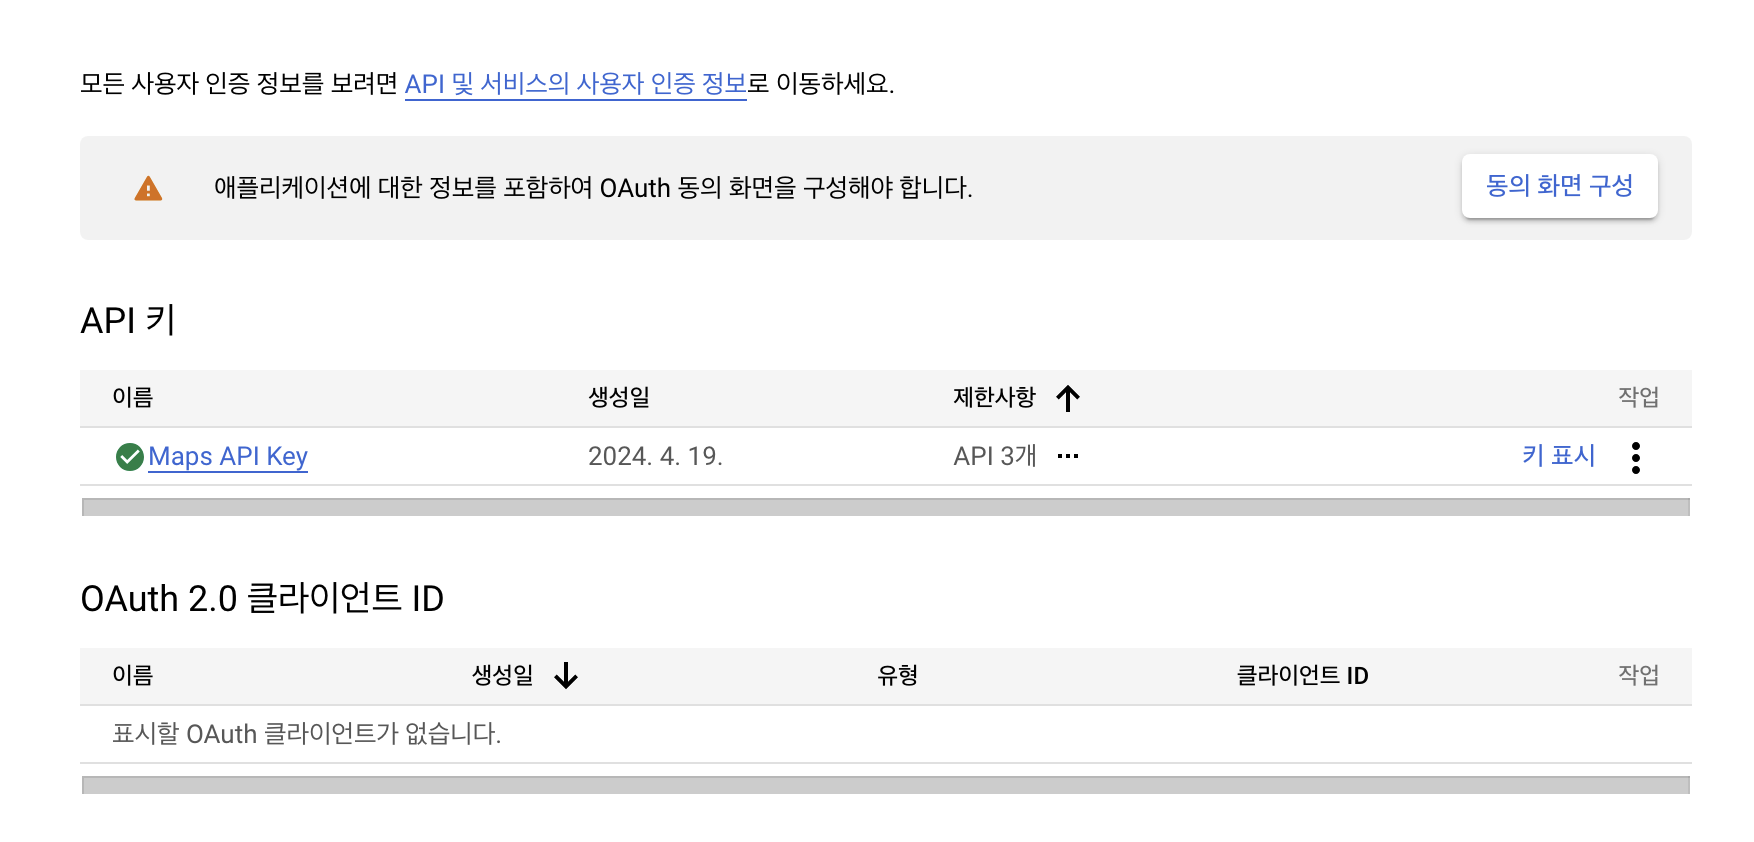
3. 다음과 같이 API 키를 성공적으로 발급받았습니다! API 키 발급 창이 나오면 복사 아이콘을 클릭해 API 키를 복사하고 메모합니다. 그리고 Google Maps Platform으로 이동 버튼을 클릭합니다.
이제 화면과 같이 나의 Google Maps Platform 페이지에 접속하면 이렇게 발급받은 API Key가 보입니다.


왼쪽 네비게이션바의 지도 스타일을 클릭해서 이렇게 지도를 디자인할 수도 있습니다✏️
이제 Google Maps API를 이용하기 위한 API 세팅은 끝났습니다. Android Studio로 넘어가 보도록 하겠습니다.
2. Android Studio 코드 추가
Gradle에 코드를 먼저 추가하겠습니다.

1. 우선 프로젝트 수준 build.gradle 파일을 열고 buildscript 아래 dependencies에 다음 코드를 추가합니다.
plugins {
    // ...
    id 'com.google.android.libraries.mapsplatform.secrets-gradle-plugin' version '2.0.1' apply false
}
2. 그 다음, 모듈 수준 build.gradle 파일을 열고 plugins 요소에 다음 코드를 추가합니다.
id 'com.google.android.libraries.mapsplatform.secrets-gradle-plugin'dependencies {
implementation 'com.google.android.gms:play-services-maps:18.1.0'
// ...
}
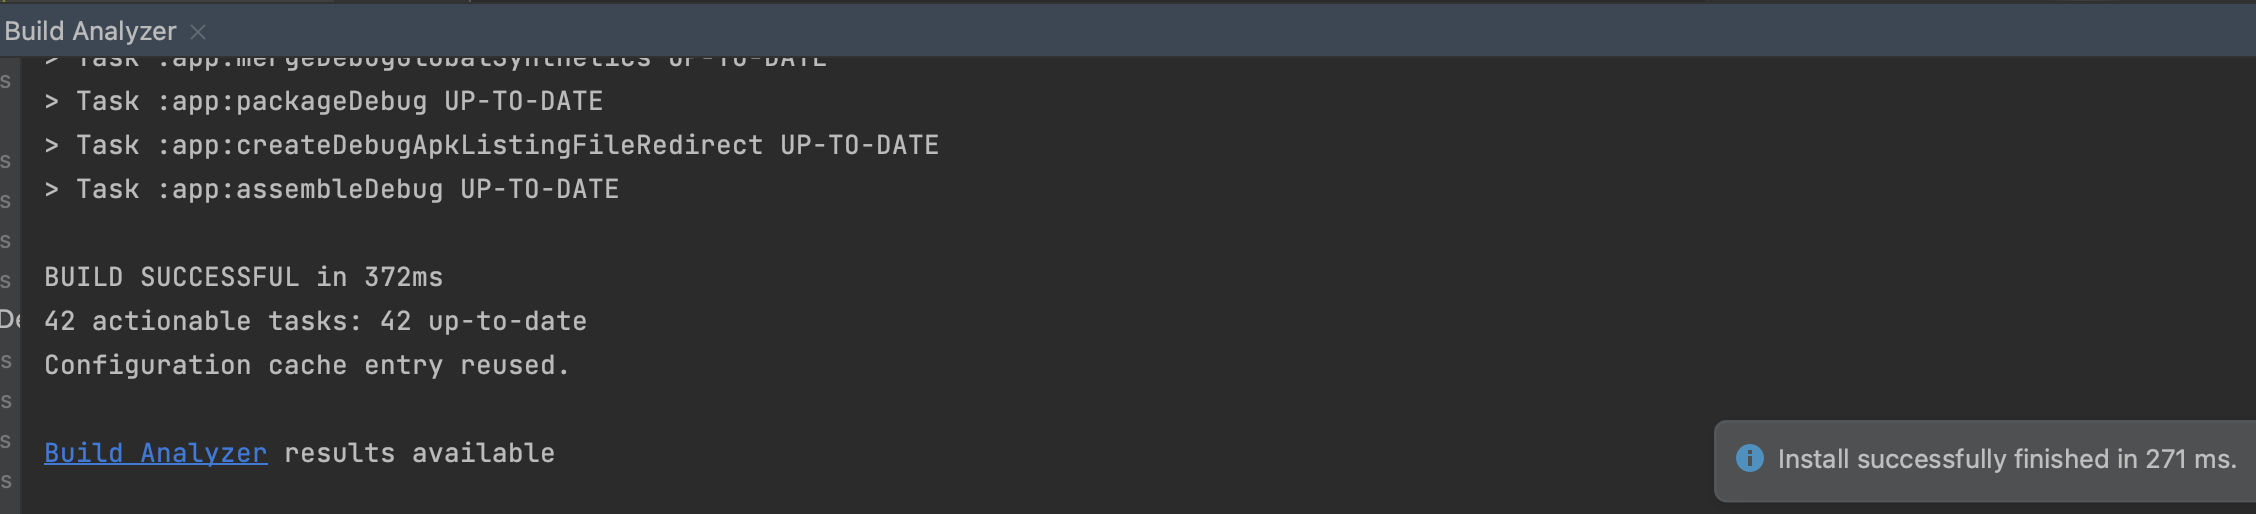
developers.google.com 은 코드를 추가하는 해당 과정을 거친 후 동기화를 거쳐서 제대로 동작하는지 확인할 것을 추천합니다.

사진과 같이 동기화가 성공했다는 문구가 뜨면 다음 절차를 진행합니다⚓️
3. 프로젝트 수준 디렉터리에서 local.properties를 열고 다음 코드를 추가합니다.
MAPS_API_KEY=YOUR_API_KEY<YOUR_API_KEY>를 1단계에서 발급받았던 API 키로 변경합니다.
여기서 <YOUR_API_KEY>는 해당 페이지에서 파란색 글씨로 표시된 키 표시 를 클릭하면 볼 수 있습니다.
4. 다음으로 AndroidManifest.xml 파일에서 com.google.android.geo.API_KEY로 이동한 후 android:value attribute를 다음과 같이 업데이트합니다.
<meta-data
    android:name="com.google.android.geo.API_KEY"
    android:value="${MAPS_API_KEY}" />
거의 다 끝났습니다!!

5. MainActivity.kt 에 다음 코드를 추가합니다.
import android.os.Bundle;
import androidx.appcompat.app.AppCompatActivity;
import com.google.android.gms.maps.CameraUpdateFactory;
import com.google.android.gms.maps.GoogleMap;
import com.google.android.gms.maps.OnMapReadyCallback;
import com.google.android.gms.maps.SupportMapFragment;
import com.google.android.gms.maps.model.LatLng;
import com.google.android.gms.maps.model.MarkerOptions;

public class MapsActivity extends AppCompatActivity implements OnMapReadyCallback {

    private GoogleMap mMap;

    @Override
    protected void onCreate(Bundle savedInstanceState) {
        super.onCreate(savedInstanceState);
        setContentView(R.layout.activity_maps);
        // Obtain the SupportMapFragment and get notified when the map is ready to be used.
        SupportMapFragment mapFragment = (SupportMapFragment) getSupportFragmentManager()
                .findFragmentById(R.id.map);
        mapFragment.getMapAsync(this);
    }

    /**
     * Manipulates the map once available.
     * This callback is triggered when the map is ready to be used.
     * This is where we can add markers or lines, add listeners or move the camera. In this case,
     * we just add a marker near Sydney, Australia.
     *
     * If Google Play services is not installed on the device, the user will be prompted to install
     * it inside the SupportMapFragment. This method will only be triggered once the user has
     * installed Google Play services and returned to the app.
     */
    @Override
    public void onMapReady(GoogleMap googleMap) {
        mMap = googleMap;

        // Add a marker in Sydney and move the camera
        LatLng sydney = new LatLng(-34, 151);
        mMap.addMarker(new MarkerOptions()
                .position(sydney)
                .title("Marker in Sydney"));
        mMap.moveCamera(CameraUpdateFactory.newLatLng(sydney));
    }
}
developers.google.com 에 기재된 코드 속 각 요소에 대한 설명은 다음과 같습니다.
- SupportMapFragment 객체는 지도의 수명 주기를 관리하며 앱 UI의 상위 요소입니다.
- GoogleMap 객체는 지도 데이터 및 뷰에 대한 액세스 권한을 제공합니다. Android용 Maps SDK의 기본 클래스입니다. 지도 객체 가이드에서 SupportMapFragment 객체와 GoogleMap 객체를 자세히 설명합니다.
- moveCamera 함수는 오스트레일리아 시드니의 LatLng 좌표에 지도의 중심을 맞춥니다. 지도를 추가할 때 가장 먼저 구성해야 하는 설정은 지도 위치 및 카메라 설정(예: 보기 각도, 지도 방향, 확대/축소 수준)입니다. 자세한 내용은 카메라 및 뷰 가이드를 참고하세요.
- addMarker 마커를 추가합니다.
다왔어요 여러분!!!! 마지막으로
6. 앱 UI의 구조를 정의하는 XML 레이아웃 파일에 다음 코드를 추가합니다. 이 파일은 res/layout 디렉터리에 있습니다.
이 코드는 Android 애플리케이션의 XML 레이아웃 파일에서 Google 지도 프래그먼트를 정의합니다. SupportMapFragment를 사용하여 지도를 표시하며, 프래그먼트의 ID는 @+id/map입니다. 레이아웃 폭과 높이는 match_parent로 설정되어 화면 전체를 차지하고, tools:context 속성은 해당 프래그먼트가 MapsActivity와 연결됨을 나타냅니다.
<fragment xmlns:android="http://schemas.android.com/apk/res/android"
    xmlns:tools="http://schemas.android.com/tools"
    android:layout_width="match_parent"
    android:layout_height="match_parent"
    android:id="@+id/map"
    tools:context=".MapsActivity"
    android:name="com.google.android.gms.maps.SupportMapFragment" />
이제 동기화 후 앱을 빌드하고 실행하면
.
.
.
.
.
.
.
.


완성입니다!! ㅎㅎ
안드로이드 스튜디오에 구글맵 추가하기 튜토리얼이 도움이 되셨길 바라며 오늘 포스팅을 마치겠습니다.